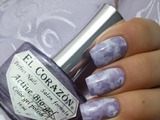
Marble manicure. MK
Marble design - it is always beautiful and is even a little mysterious.
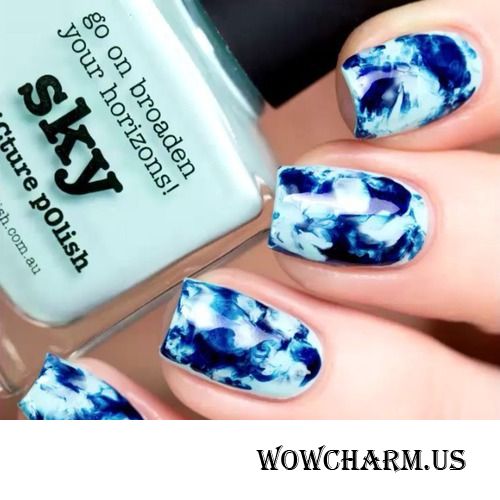
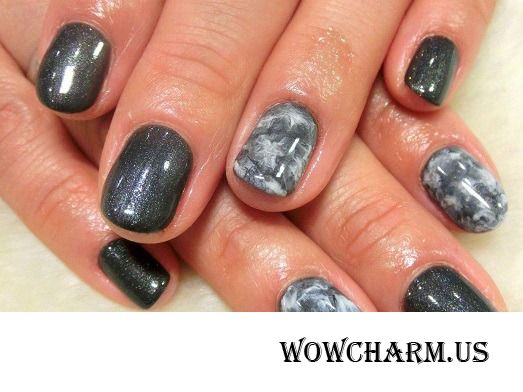
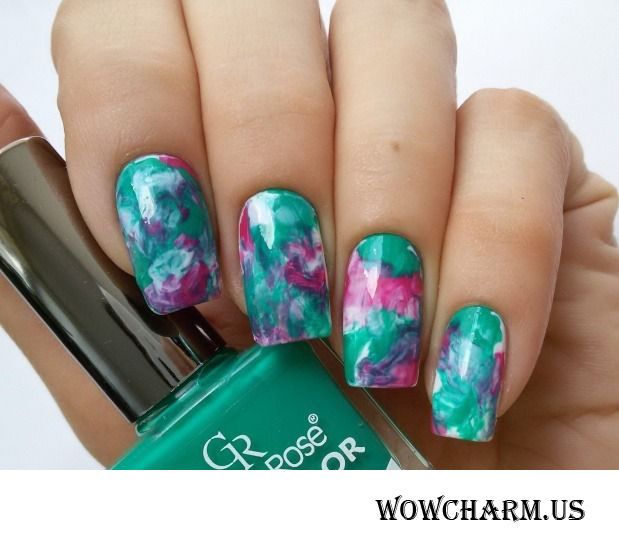
There are several ways of creation of marble design of nails.
One photo higher all manicures are executed in one equipment.
How does it become? See below.
I will shortly describe process.
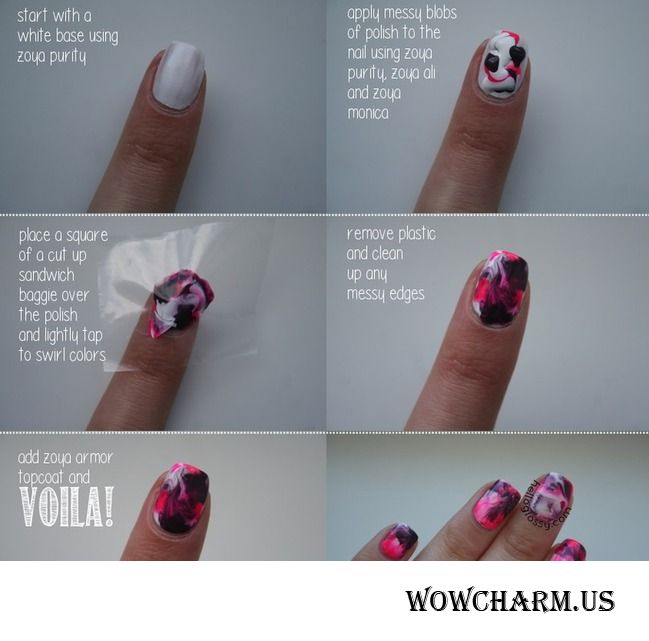
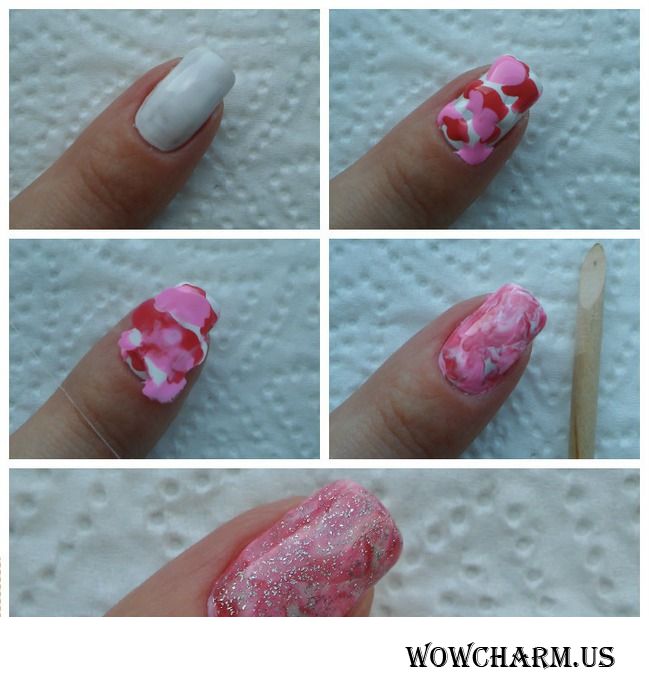
1. We cover nails with base, and then a layer of the lightest varnish, from among what you will use in design, or just a layer of white varnish.
2. After drying of our substrate under design we drip from above on couple of drops of all color varnishes in a chaotic order.
3. We take a piece of cellophane or a file, we put from above on a nail and it is pressed accurately down by a finger, observing through transparent cellophane as colors mix up.
4. Having achieved the necessary result, accurately we remove cellophane and we dry up a varnish covering.
5. We cover with a top.
That it was even more clear, I suggest to watch video.
I did similar design too and before to show what at me turned out, I will give couple of advice from personal observations.
For such way it is better to take three, at most four colors. If it is less, the marble effect will be poorly expressed if it is more, then risk to receive unintelligible porridge on nails.
Most advantageously in such design colors of one scale look, but sometimes it is possible to mix the color shades far from each other and to receive great result. The truth it is in advance difficult to foresee that process will turn out as a result therefore it is the best of all to try a combination of various shades among themselves at first somewhere on a palette and already then if the result arranges, to transfer to nails.
For what at first to paint nails light varnish? First, on light substrates all colors reveal more brightly, and secondly, it is a guarantee of completely painted over nail. In the sense that if to mix varnishes on a naked nail, that is the probability in process to fall short this varnish "mash" under cellophane of a cuticle and side rollers and then it is necessary to finish drawing an accurate contour around a nail a brush. Or on the contrary, it is possible not to try to hold out the mixed covering to the brim if from below under it a substrate. And it is less dirt around a nail, both emptiness will not be, and a contour already accurate. Well if you, of course, initially accurately laid varnish substrate on nails.
If there is a top drying, then it is better to use it for drying process acceleration as the layer of the mixed varnishes, as a rule, turns out not the thinnest. But in principle, if the used varnishes in itself not dolgosokhnushchy, then it is possible to wait also for natural drying of a varnish surface. But it is all the same desirable to cover with a usual top design for smoothing of a surface.
There now, it seems, and all cunnings.
It seems difficult, but only at first sight. Actually everything is simple! But as it is effective!
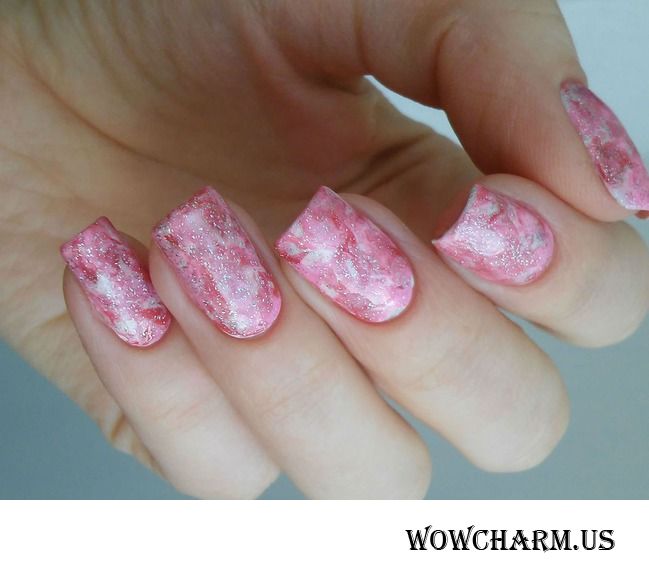
And now I will show the option of marble manicure.
I trained him on a competition in which I won recently, on "I Lakomanyak". But decided not it to expose as competitive work, considered that it is too simple.
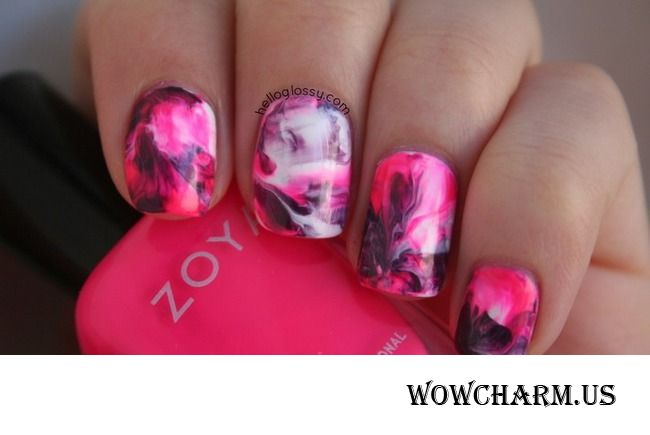
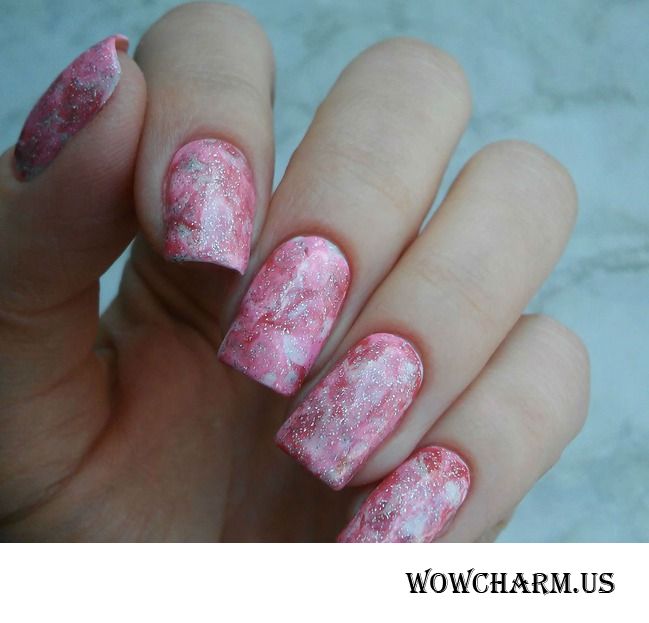
I used three varnishes: white, bright pink and dark pink. All process completely coincided with the fact that on a photo of MK or on video.
Only at the end I added a highlight, covered not with a usual top, but a top from a golokhlopyama.

I hope information was interesting and useful to you.
To the following posts!
And beautiful to you manicures!
Photos are taken from here: instagram.com, kosmetista.ru
There are several ways of creation of marble design of nails.
One photo higher all manicures are executed in one equipment.
How does it become? See below.
I will shortly describe process.
1. We cover nails with base, and then a layer of the lightest varnish, from among what you will use in design, or just a layer of white varnish.
2. After drying of our substrate under design we drip from above on couple of drops of all color varnishes in a chaotic order.
3. We take a piece of cellophane or a file, we put from above on a nail and it is pressed accurately down by a finger, observing through transparent cellophane as colors mix up.
4. Having achieved the necessary result, accurately we remove cellophane and we dry up a varnish covering.
5. We cover with a top.
That it was even more clear, I suggest to watch video.
I did similar design too and before to show what at me turned out, I will give couple of advice from personal observations.
For such way it is better to take three, at most four colors. If it is less, the marble effect will be poorly expressed if it is more, then risk to receive unintelligible porridge on nails.
Most advantageously in such design colors of one scale look, but sometimes it is possible to mix the color shades far from each other and to receive great result. The truth it is in advance difficult to foresee that process will turn out as a result therefore it is the best of all to try a combination of various shades among themselves at first somewhere on a palette and already then if the result arranges, to transfer to nails.
For what at first to paint nails light varnish? First, on light substrates all colors reveal more brightly, and secondly, it is a guarantee of completely painted over nail. In the sense that if to mix varnishes on a naked nail, that is the probability in process to fall short this varnish "mash" under cellophane of a cuticle and side rollers and then it is necessary to finish drawing an accurate contour around a nail a brush. Or on the contrary, it is possible not to try to hold out the mixed covering to the brim if from below under it a substrate. And it is less dirt around a nail, both emptiness will not be, and a contour already accurate. Well if you, of course, initially accurately laid varnish substrate on nails.
If there is a top drying, then it is better to use it for drying process acceleration as the layer of the mixed varnishes, as a rule, turns out not the thinnest. But in principle, if the used varnishes in itself not dolgosokhnushchy, then it is possible to wait also for natural drying of a varnish surface. But it is all the same desirable to cover with a usual top design for smoothing of a surface.
There now, it seems, and all cunnings.
It seems difficult, but only at first sight. Actually everything is simple! But as it is effective!
And now I will show the option of marble manicure.
I trained him on a competition in which I won recently, on "I Lakomanyak". But decided not it to expose as competitive work, considered that it is too simple.
I used three varnishes: white, bright pink and dark pink. All process completely coincided with the fact that on a photo of MK or on video.
Only at the end I added a highlight, covered not with a usual top, but a top from a golokhlopyama.
I hope information was interesting and useful to you.
To the following posts!
And beautiful to you manicures!
Photos are taken from here: instagram.com, kosmetista.ru
Copy the code and insert into a window of creation of record on LiveInternet, previously having included the Source mode there.
HTML-code: 
|
|
| The BB code for forums: |
How will it look?
wowcharm.us → Marble manicure. MK
|
Marble design - it is always beautiful and is even a little mysterious. There are several ways of creation of marble design of nails. One photo higher all manicures are executed in one equipment. How does it become? See below. I will shortly describe process. 1. We cover nails with base, and then a layer of the lightest varnish, from among what you will use in design, or just a layer of white varnish. 2... Read more: |
| "Pedicure small fishes. | | | Extension glitter or glitterny gradient." |
|
Other discussed materials:
Not terribly
How to diversify Maslenitsa: the new culinary ideas for a holiday table
Ship's biscuit apple and onions with cheese.
Photo flashmob. The 119th stage. New subject: "Pear hangs." Reception of a photo till February 17 inclusive.
|