
|
Hairstyles and care of hair All about care of hair of the house and in salon. What we do that our hair remained healthy, beautiful and brilliant in any circumstances and weather conditions!
Introduction: open
Records in community are visible: all
|
Diary headings
To sort on:
- • to date of creation
- to rating
- to number of comments
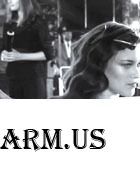
Records with the "step-by-step photos" tag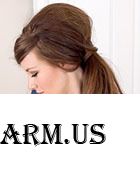 Buy a chignon from laid on locks in the form of "hat". Buy a chignon from laid on locks in the form of "hat".It is easily attached to natural locks by clip-on earrings. Color has to be the same as your own hair or as your dyed hair. And now the Master class how to use a chignon in a stylish hairstyle. It is shown by the byyuti-blog of the BobbyGlam company (www.bobbyglam.com/blog), the producer of accessories for hair. Step 1. Take away hair on one party (it is possible without accurate hair parting). Step 2... To read further"
 The tail of a lobster is such hairstyle for long hair which represents the relaxed braid on one side. The style is suitable for office everyday life and for a party. We try! The tail of a lobster is such hairstyle for long hair which represents the relaxed braid on one side. The style is suitable for office everyday life and for a party. We try!Style: Salon Mario Russo (mariorusso.com), Photo: Regan Communications Group. Step 1. The hairstyle best of all looks on hair which were washed a day ago, and even on dirty hair. It is necessary to create texture which will well hold the necessary form... To read further"
 One more plus: the hairstyle equally well looks with bright beach hair accessories, on wet hair, dry, direct and wavy. One more plus: the hairstyle equally well looks with bright beach hair accessories, on wet hair, dry, direct and wavy.Stylish, simply, quickly! Do independently or by means of the girlfriend. Step 1. Begin with combing of hair. Put the means for laying suitable your hair. For direct and dense – varnish, for wavy – gel, for thin – mousse. Step 2... To read further"
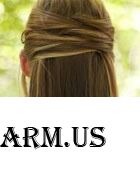
 Prepare thin scrunchies, invisible hairpins, hairpins, hairspray. Prepare thin scrunchies, invisible hairpins, hairpins, hairspray.Bunch from the French braid Step 1. Begin with texturing of hair. Curls and slightly elf-lock hold a hairstyle better. Therefore you can twist hair nippers or on thermo-hair curlers, fix waves by varnish and also comb slightly at roots as necessary. Then the braid will be dense and volume. Step 2. Braid an easy French braid, fix by an elastic band on the end. Leave not braided tip no more than 5 cm long... To read further"
 Why often house clarification or highlighting looks sharply and is even rough? Secret not in color. The main secret which is owned by stylists is the correct sectioning and patience. Yes, you do not hurry, you do not seek to reduce quantity of the painted locks. On the contrary – make as much as possible the painted locks. Here the rule works: there are a lot of thin locks better, than it is not enough and thick. Why often house clarification or highlighting looks sharply and is even rough? Secret not in color. The main secret which is owned by stylists is the correct sectioning and patience. Yes, you do not hurry, you do not seek to reduce quantity of the painted locks. On the contrary – make as much as possible the painted locks. Here the rule works: there are a lot of thin locks better, than it is not enough and thick.Begin with dry hair. Prepare mix for highlighting... To read further"
 For laying will be required: For laying will be required:- hair dryer, - round hairbrush, - a hairbrush for a pile – with frequent teeths, - curling tongs. And here, laying means it will be required much: mousse (gel), the dry shampoo texturing spray (hydrochloric spray), lipstick for hair (wax), hairspray. Step 1. Begin with clean and dry hair. Roots have to be dry too, then laying will hold on longer! Apply gel or mousse for laying on hair... To read further"
 We will do the relaxed and uniform curls which begin not from roots. We will do the relaxed and uniform curls which begin not from roots.There are several ways to realize the idea, but we chose the simplest – just for fast collecting on an appointment. Step 1. Begin with wet and clean hair. Apply mousse for volume on large segments of hair. A hairbrush distribute mousse and you dry the hair dryer. Step 2. Do a wave on thin locks. Begin with a back part of the head... To read further"
 Create this hairstyle, and do not think any more of how to transform it to evening – a horse tail with a volume of hair – the universal decision, it will be suitable both for work, and for parties. Create this hairstyle, and do not think any more of how to transform it to evening – a horse tail with a volume of hair – the universal decision, it will be suitable both for work, and for parties.Step 1. Divide hair into segments: separate the top part of hair, fix by a hairpin or a hairpin. Step 2. Take away hair from the lower segment back and make of them a horse tail in the middle. If your fine own hair has also no volume at roots, apply dry shampoo on roots. Fix a tail by an elastic band... To read further"
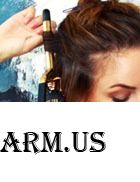 Step 1. Begin with classical division of hair into sections. Separate the upper hair (everything that above ears) and pin up them a clip. Step 1. Begin with classical division of hair into sections. Separate the upper hair (everything that above ears) and pin up them a clip.Step 2. Take nippers of small diameter, and wind thin locks. The direction – always back to the center. The main condition – do not use a clip on nippers that tips remained untouched. For short hair it is not necessary to twist tips in a hard curl that there was length of hair, and the wave did not look as "ram". Leave not curled a tip approximately on 2-2.5 cm... To read further"
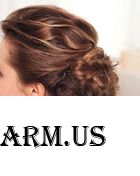
 It is possible to decorate with a braid bow a part of a hairstyle, it is possible to create from it a beautiful tail. Sometimes it is enough for effect of 3-4 segments of a braid bow. It is possible to decorate with a braid bow a part of a hairstyle, it is possible to create from it a beautiful tail. Sometimes it is enough for effect of 3-4 segments of a braid bow.There are several ways to create this interesting 3D - effect. Some textbooks tell that such braid bow can be done of the braid weaved out of four locks. There are options when the usual Russian plait as a preliminary stage is done. We will show reception at which the French braid becomes a preliminary stage. Step 1... To read further"
To show still

Pages:
|


